
CONSOLE GUIDE / GUIDE MAP
Console guide map
This guide describes how to use the TokGate console. Interfaces, features, and workflows are subject to change, with the current application taking precedence. Prompts and generated results are for illustrative purposes only, and actual output may vary. Pricing, credits, and billing are subject to the platform’s current policies.
Feature map
Choose the section for your task. Select an item to see its interface and instructions below.
Available credits and overall usage
Browse text, image and video models
Chat and generate images or videos
Credentials and usage limits
Add credits and review transactions
Request status, spending and exports
Platform notices and updates
Profile, password and appearance
How to use the console
Try models online or connect your application through the API. Browse Models first if you have not chosen a model.
Solid lines show the suggested order; dashed lines indicate optional steps. Select a node to open its guide.
You can open Playground, select a model and enter a prompt without creating an API key. Playground sends real model requests and incurs usage charges under the applicable billing rules.
Quick links
Overview
Account summary
Check available credits, recent requests and spending trends.
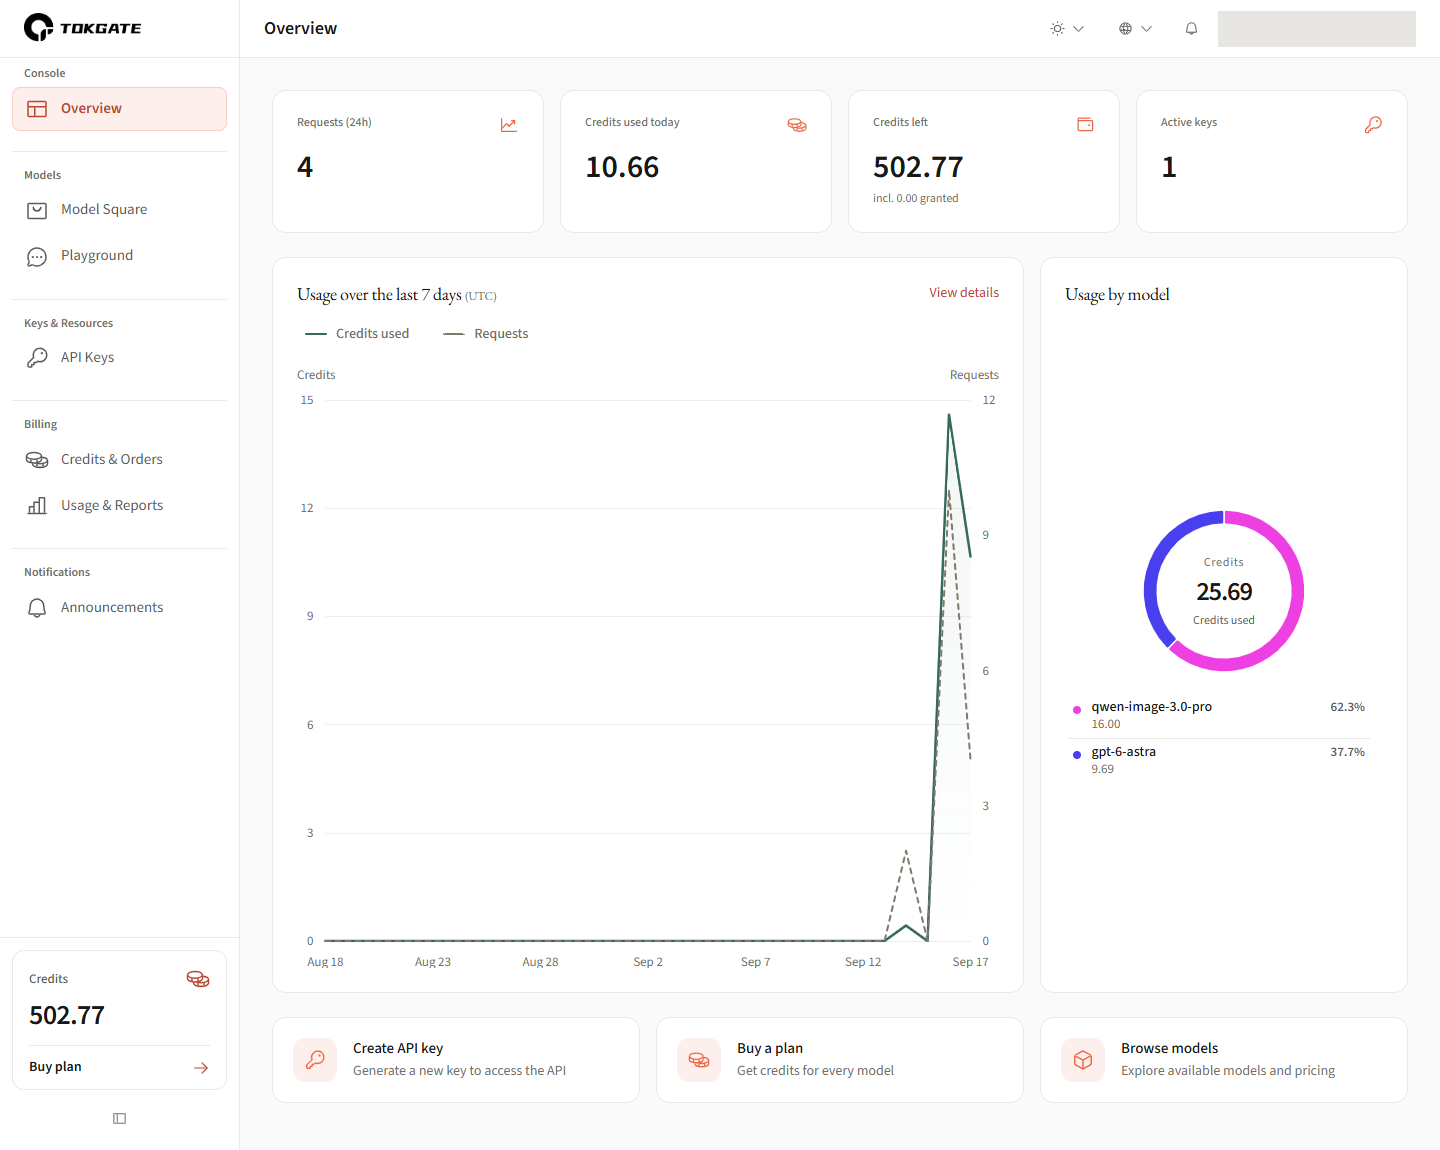
Account metrics
View request counts, available Credits and active keys. Each metric's time range is shown in its label.
Usage trends
Review changes over time. Select View details to open the usage page.
Usage by model
See how usage is distributed across models. Shortcuts at the bottom let you create a key, buy credits or browse models.
Models
Model catalog
Browse TokGate's text, image and video models. Compare capabilities, context windows and prices.
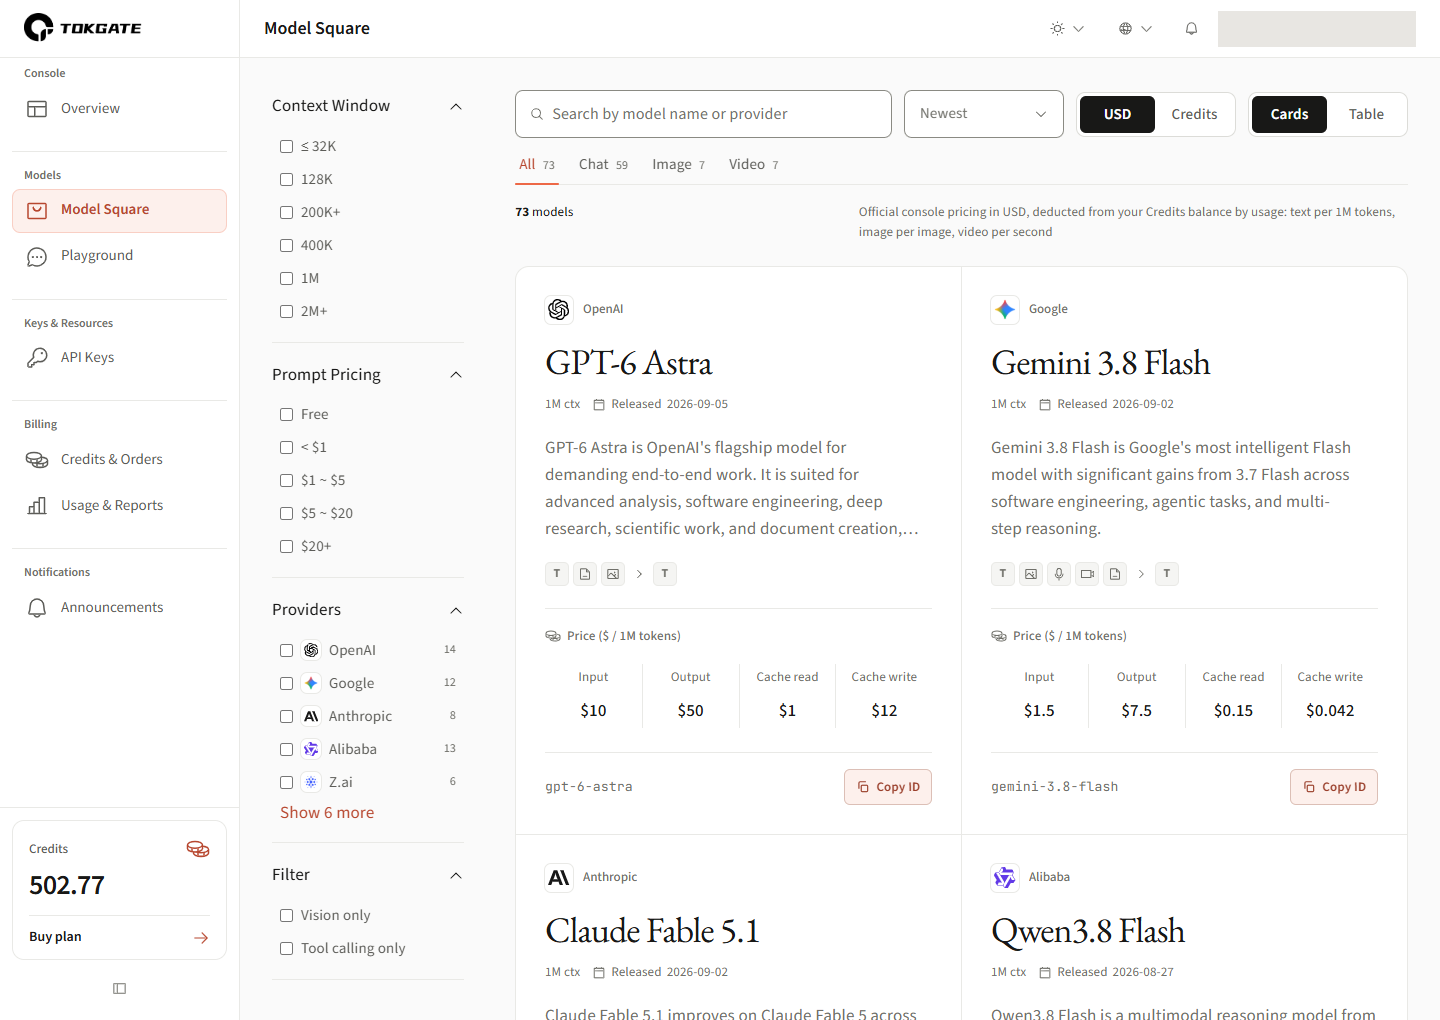
Search and categories
Enter a model name or switch categories. Categories reflect the models in the current catalog.
Filters
Narrow results by provider, context window, price or capability to find a model for your task.
Model details and IDs
Review capabilities and pricing, and copy the model ID for API calls. Check the billing unit for each price.
To test a model, open Playground and select it there.
Playground
Try models online
Chat or generate images and videos in your browser.
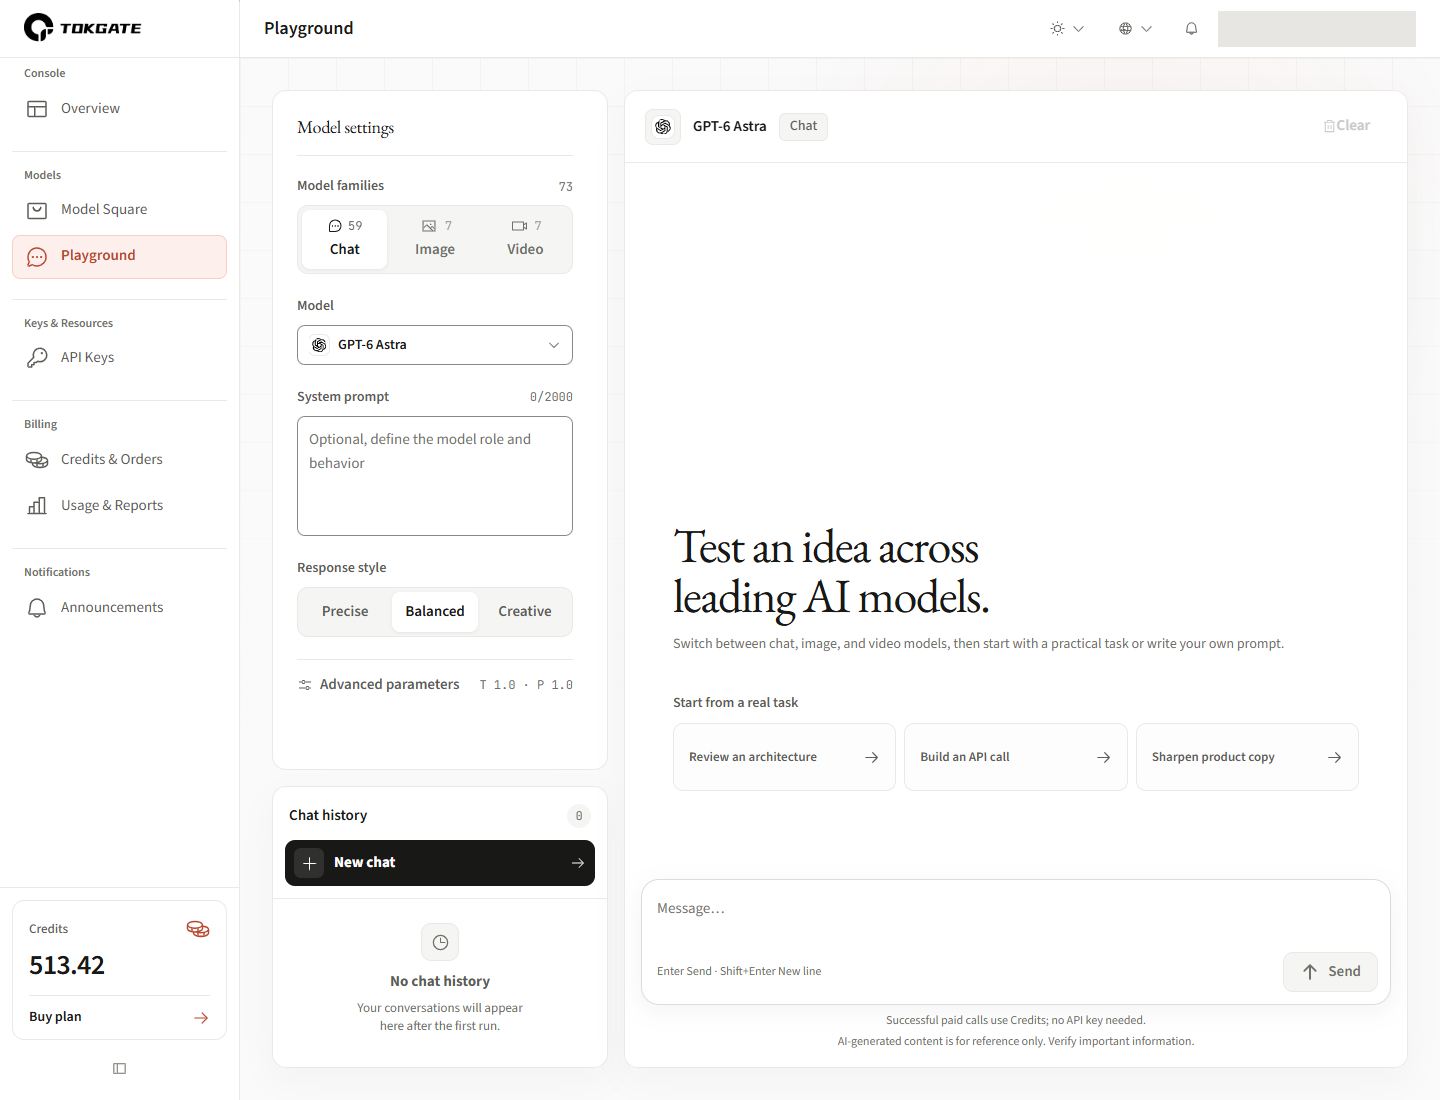
Models and parameters
Choose models and configure generation here. The tutorials below explain each task type.
Chat history
Manage conversations stored in this browser. History does not automatically sync across devices.
Input and results
Enter your task at the bottom; replies and generated media appear above.
Example: configure a support assistant with a consistent reply format
Select Chat and a text model. This example uses GPT-6 Astra. The system prompt defines the role, output format and limits on promises; the message contains only the customer's question. Configure the controls below before sending.
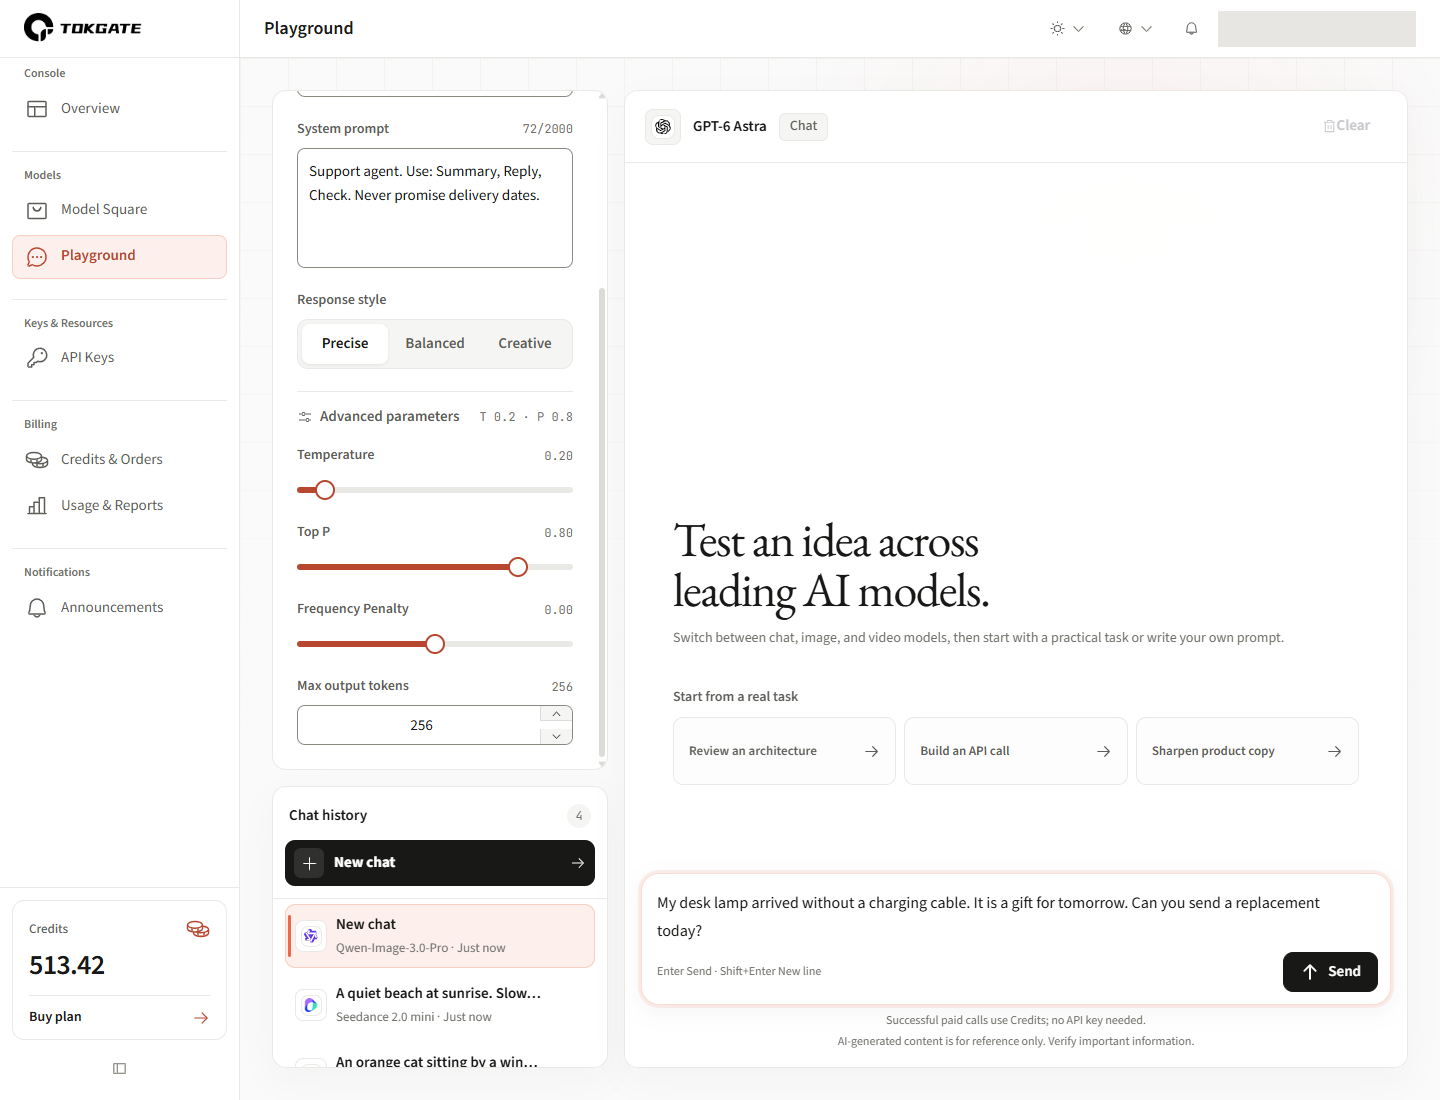
System prompt: define the role and rules
In System prompt, enter: “Support agent. Use: Summary, Reply, Check. Never promise delivery dates.” This is sent with text requests to guide the role and response format. It is optional and accepts up to 2,000 characters.
Response style: choose a parameter preset
Select Precise for a more consistent support reply. Balanced and Creative offer other presets. These adjust Temperature, Top P and Frequency Penalty together; they do not change the model.
Advanced parameters: control variation and length
Expand Advanced parameters. Keep the Precise preset's Temperature at 0.20, Top P at 0.80 and Frequency Penalty at 0.00. Set Max output tokens to 256. This is a ceiling, not a required output length. The system prompt defines the three-part format. You do not need to adjust every parameter for your first request.
| Parameter | Purpose and guidance |
|---|---|
| Temperature | Controls variation. Lower values tend to be more consistent; higher values produce more variety, not necessarily more accuracy. |
| Top P | Limits the probability range of candidate tokens. Usually adjust Temperature first and leave Top P at its preset. |
| Frequency Penalty | Positive values tend to reduce repeated wording. Leave it at 0 unless repetition is a problem. |
| Max output tokens | Caps a single response. Tokens are not the same as characters. A low limit can truncate a reply; 0 omits a client-side limit, but model and server limits still apply. |
Enter the customer's question and send
Enter: “My desk lamp arrived without a charging cable. It is a gift for tomorrow. Can you send a replacement today?” Select Send or press Enter. Shift + Enter inserts a line break. The message does not repeat the format rules; those come from the system prompt.
Review the actual reply
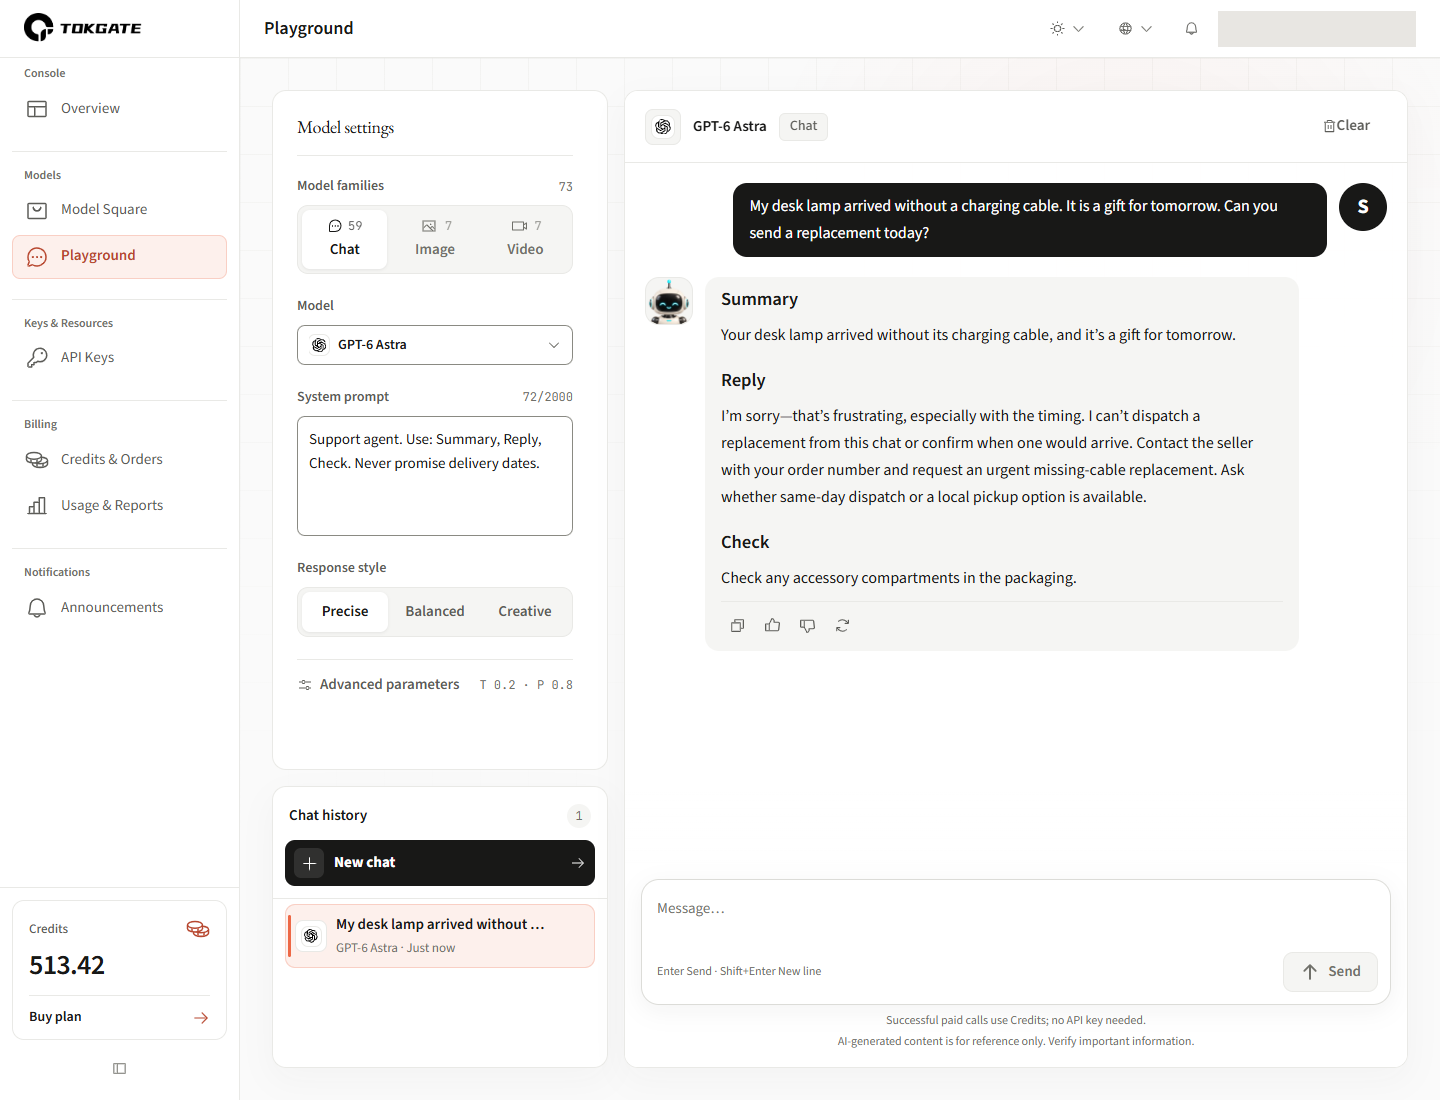
Read and copy the reply
The reply follows the requested Summary, Reply and Check sections without promising a delivery date. Use the copy icon below the reply to save its text. This is an actual response to the example configuration. System prompts guide the model; always check the result.
Ask a follow-up question
Add context in the message box, such as “The order number is A1001. I cannot share a photo yet. Please update the reply.” The current system prompt is also sent with subsequent text requests. Review the generated answer.
Other conversation controls
- Task cards: insert a sample prompt into the message box. Review or edit it before sending.
- Stop: stop receiving the current generation. This does not refund usage already incurred.
- Regenerate: the latest text reply can be regenerated in the same conversation. Earlier replies and images open a new conversation, keeping the original. This sends a new request. Videos with saved task records do not offer the same retry control.
- Feedback: rate a reply using the thumbs-up or thumbs-down button.
- New chat and history: start a separate task or switch conversations in the history list. Use pagination for older conversations. Switching conversations does not cancel image or video generation. Save important results before deleting a conversation.
- Clear: clear the current conversation. Save anything you need first.
- Mobile settings: open the model and parameter panel using the settings button above the conversation.
Generate an image
The screenshot shows the setup before sending an image request.
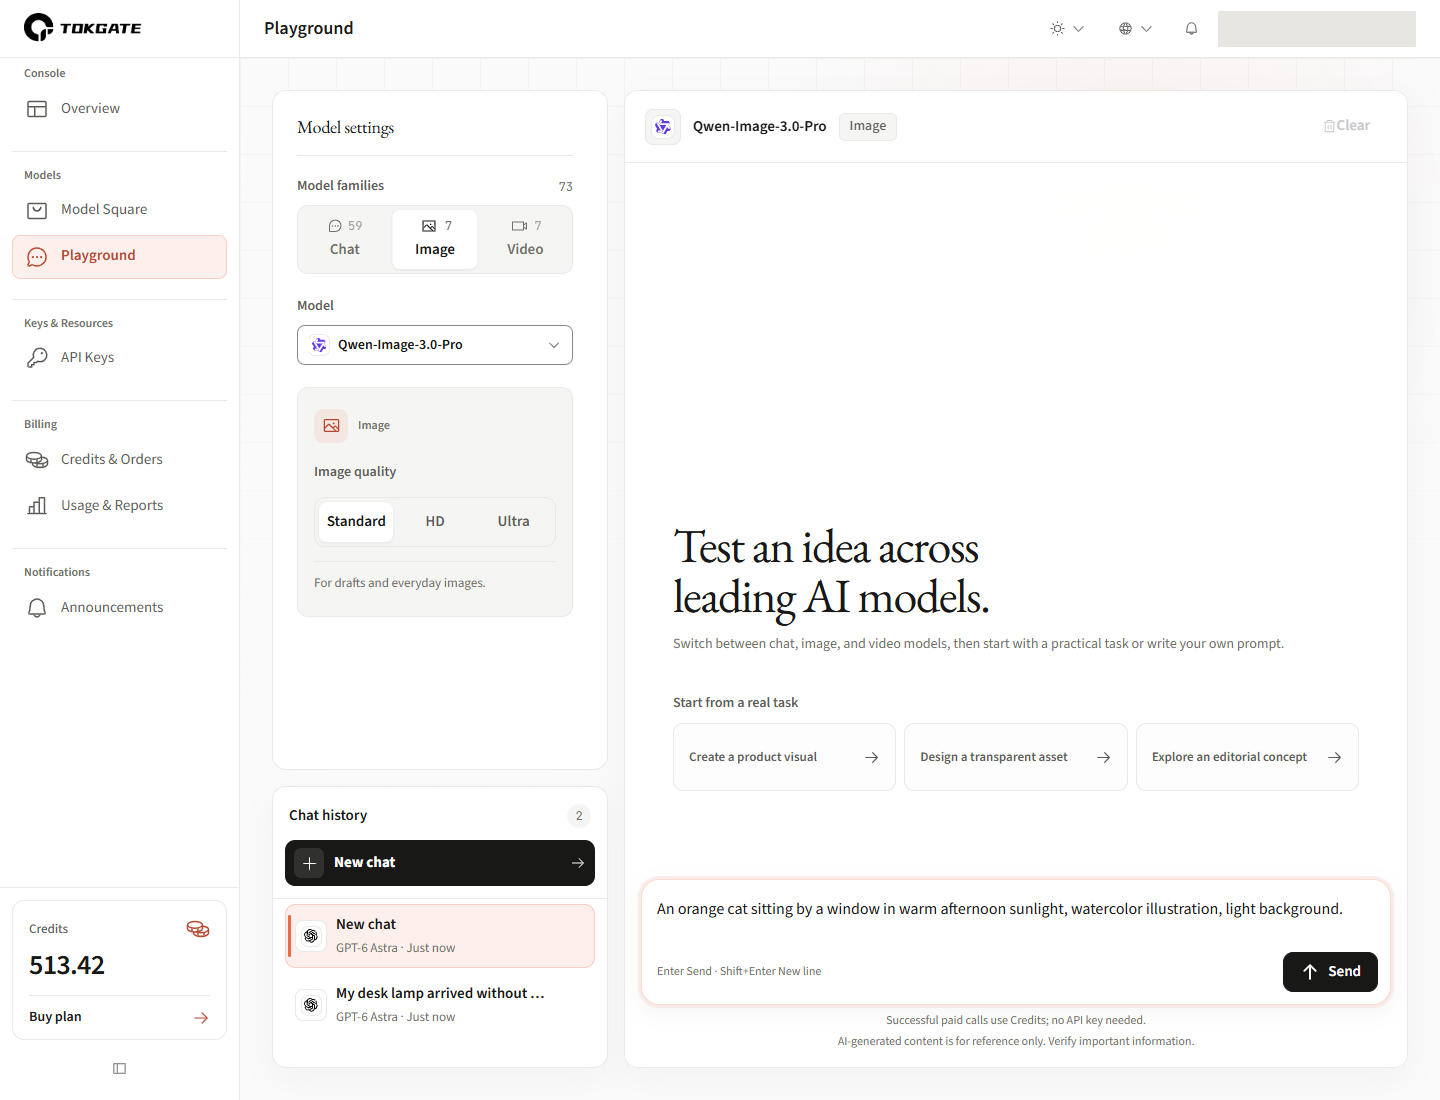
Select a model and image quality
Select Image, then choose a Model. Image quality offers Standard, HD or Ultra where supported; unavailable options are disabled. Start with Standard. For a transparent background, choose a supported GPT Image 2 model and enable Transparent PNG. Other models do not show this option.
Write a prompt and send
Describe the subject, setting and visual style in the message box, then select Send. Example: “An orange cat sitting by a window in warm afternoon sunlight, watercolor illustration, light background.”
After generation: preview and save
This is an actual result from Qwen-Image-3.0-Pro at Standard quality. Wait for Image ready, then preview or download it.
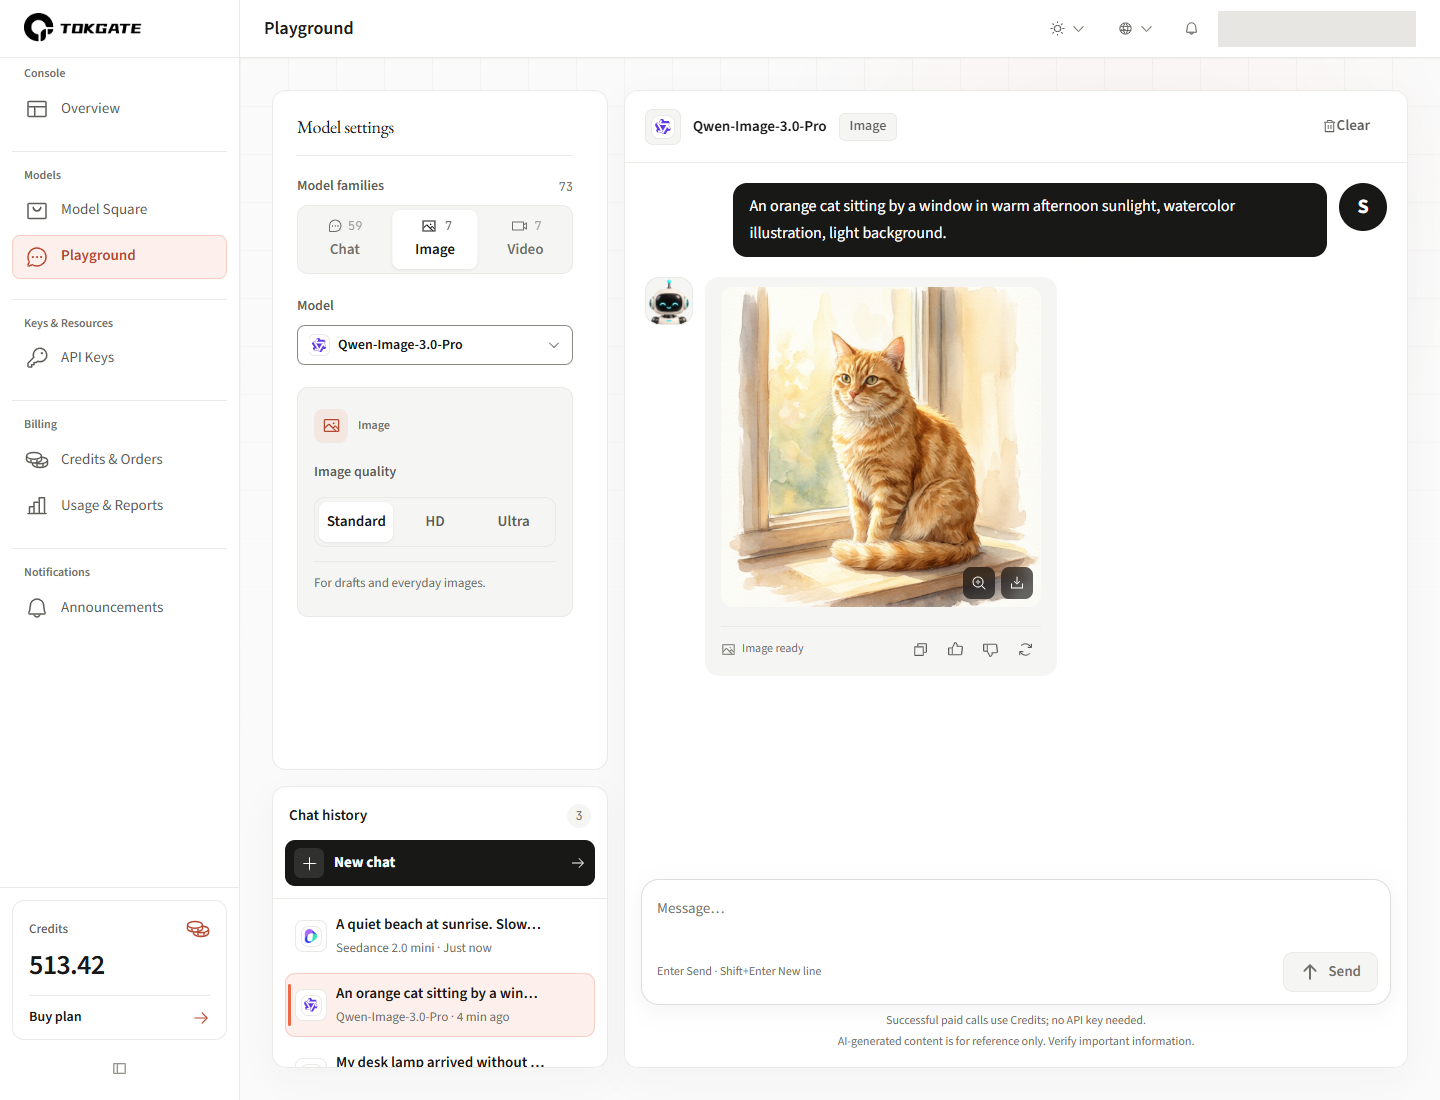
View the generated image
The image appears below your prompt. Select it to inspect the details. This example is a watercolor cat; dimensions depend on the selected model and quality.
Preview and download
Hover over the image to reveal preview and download controls at the bottom right. Copy below the reply copies the image, or its URL if image copying is unavailable and a URL exists. Use Download if copying fails. Save important images promptly. Sending an edited prompt creates another request.
Generate a video
The screenshot shows the setup before sending a video request.
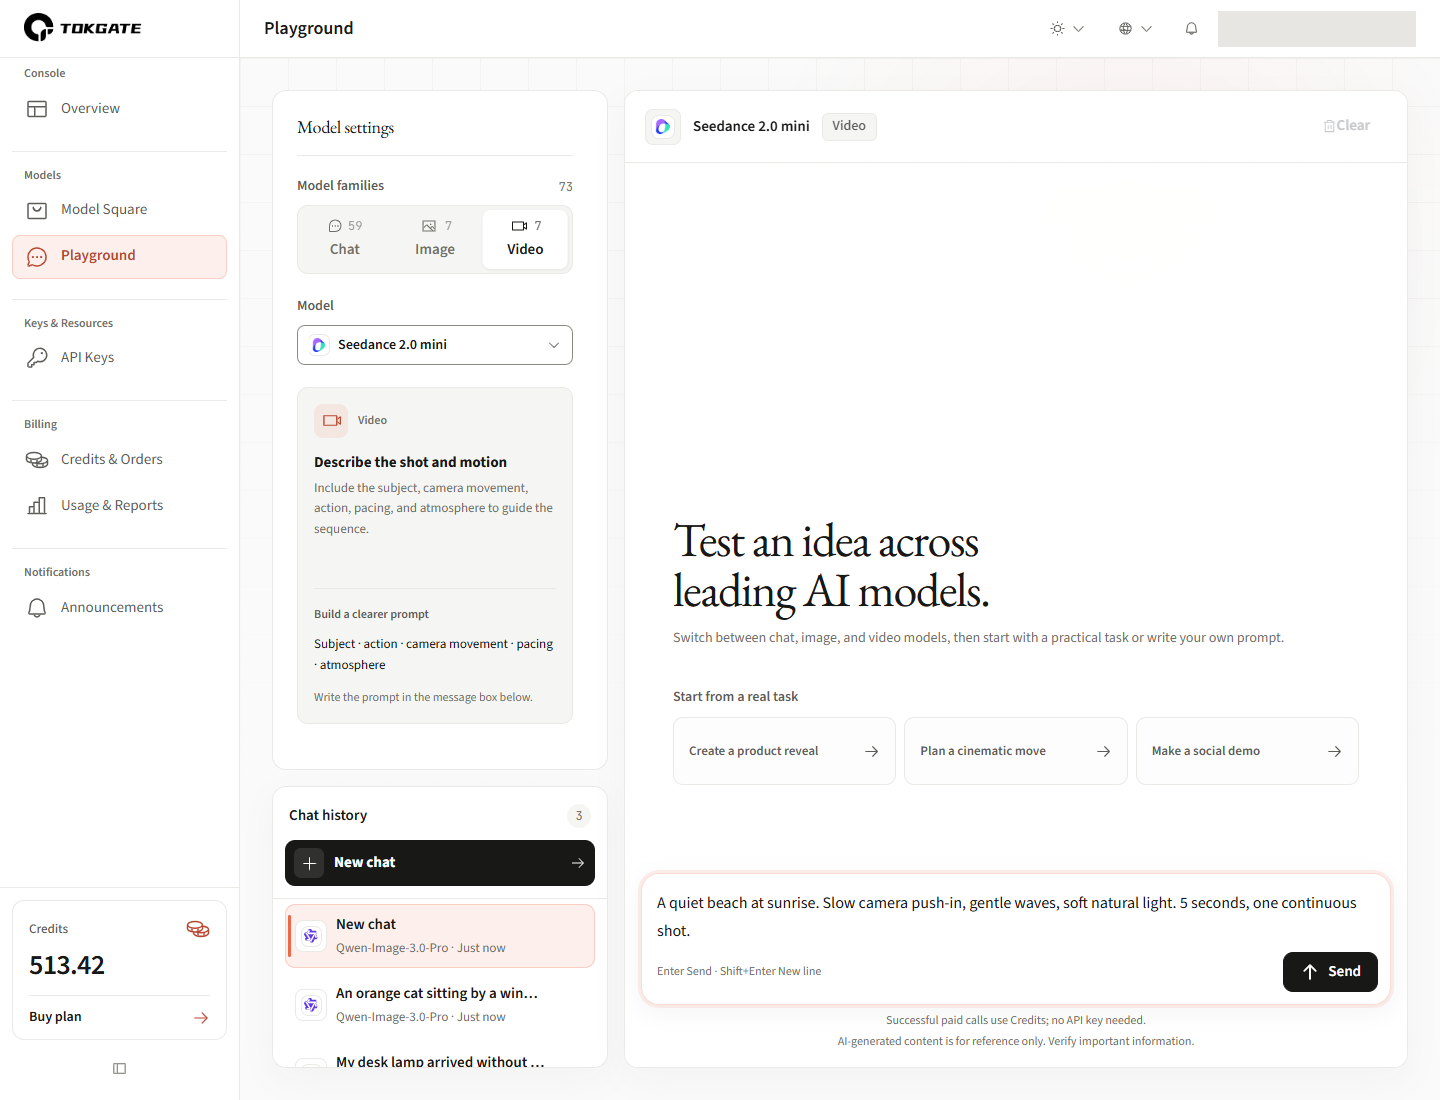
Select a video model
Select Video, then choose a Model. The guide on the left helps you describe the subject, action, camera movement, pacing and atmosphere.
Describe the shot and send
Example: “A quiet beach at sunrise. Slow camera push-in, gentle waves, soft natural light. 5 seconds, one continuous shot.” Review your model and prompt, then select Send.
After generation: play the 5-second video
This example uses Seedance 2.0 mini with a requested duration of 5 seconds at 720p. When generation finishes, a video player appears in the conversation.
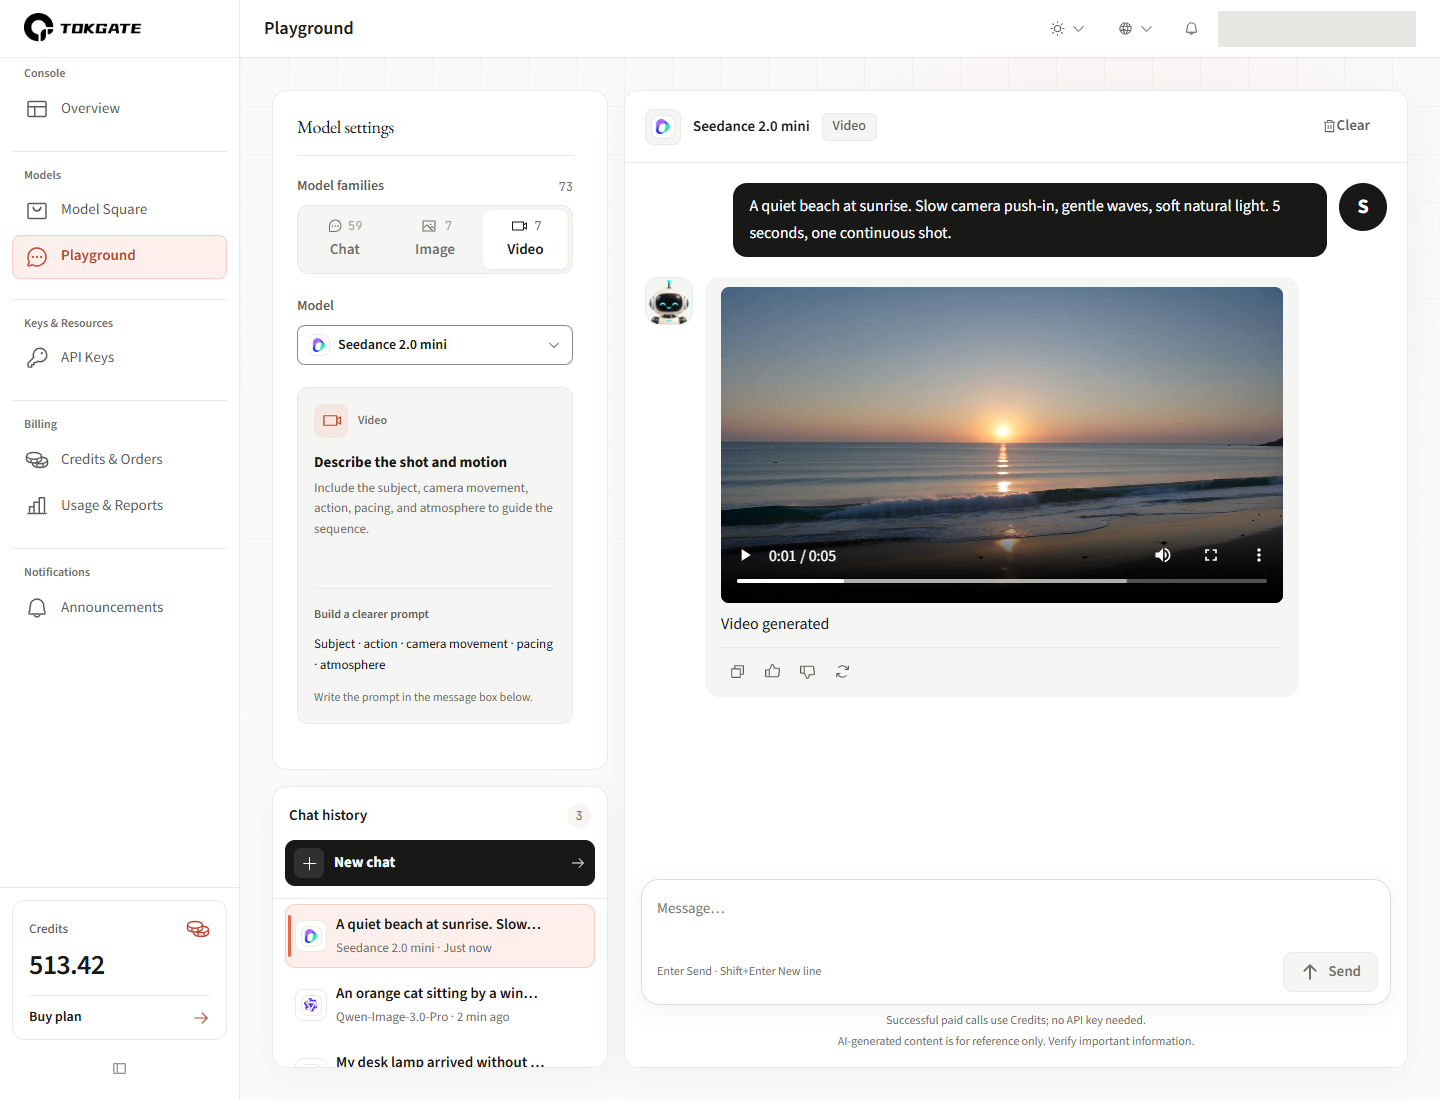
Play and check the duration
Use the bottom-left play control and scrub the timeline to review the clip. Volume and full-screen controls are on the right. Copy below the reply copies the video URL.
You can return to the original conversation after switching away. If task information was saved, reopening the conversation resumes checking that task. Some send, clear or regenerate controls may be unavailable while checking. Review the existing task before submitting again to avoid duplicate usage.
If Send is unavailable, check that a model is selected, your message is not empty, and generation or history loading has finished. Read any error message. If credits are insufficient, top up in Billing, confirm the credits arrived, then send again. Review status and usage in Usage.
API Keys
Access management
Create credentials for your application or external tools. Use separate keys for different purposes and set suitable limits.
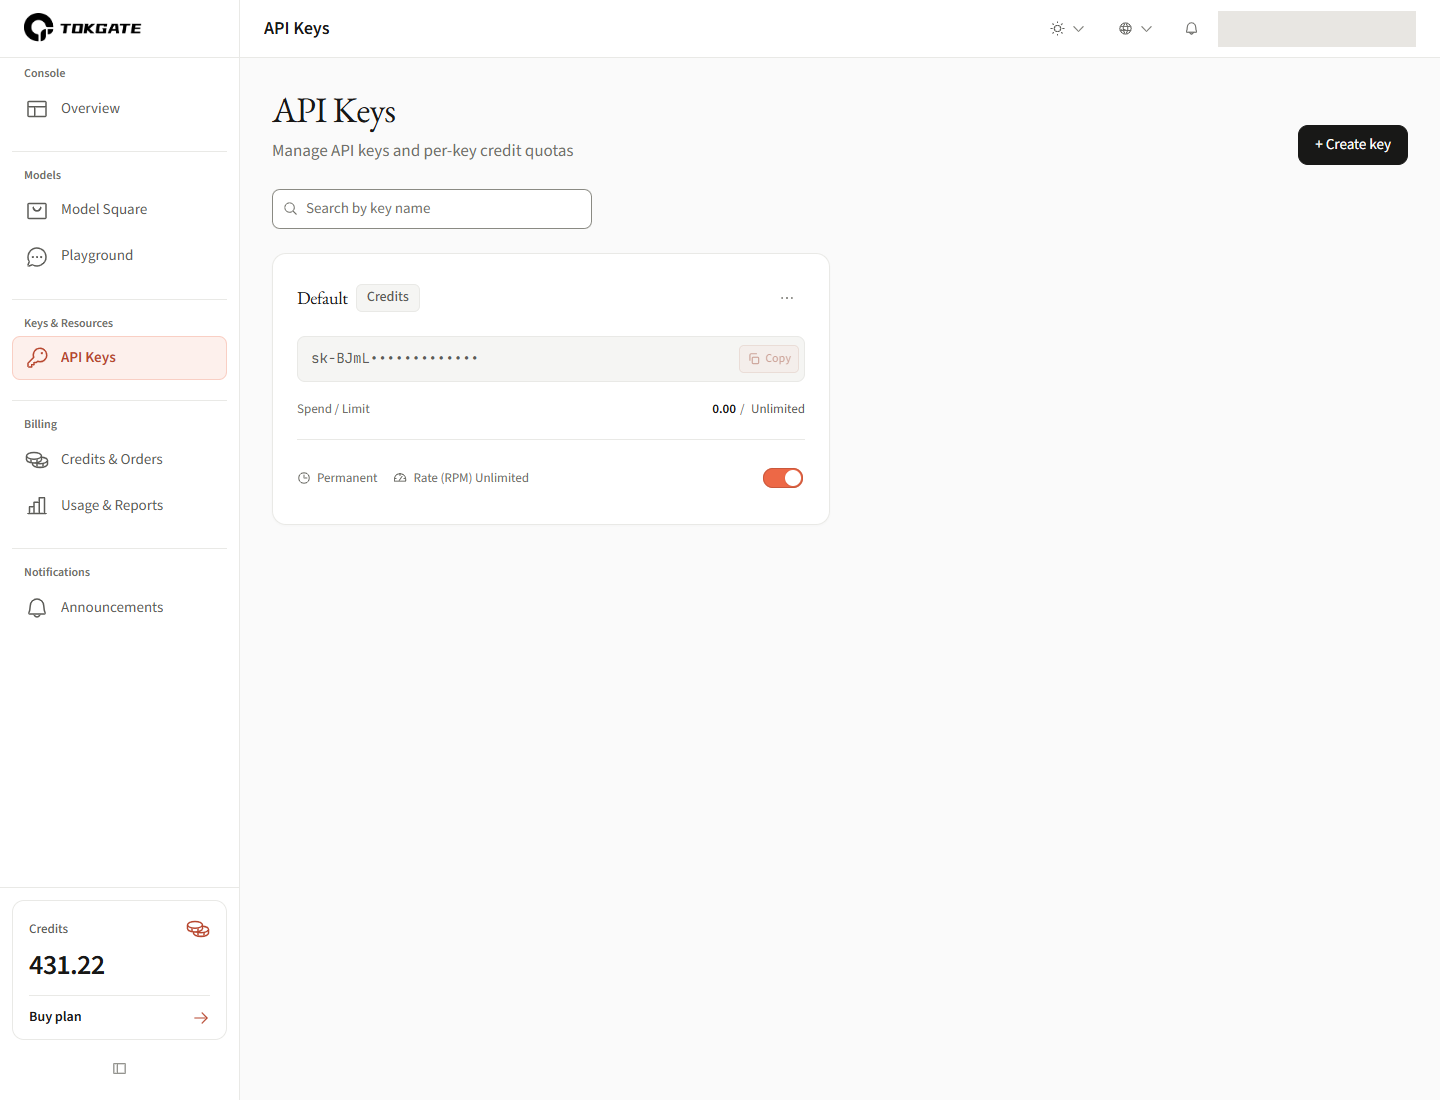
Create a key
Select Create key to open the configuration form below.
Key list
Check each key's name, masked value, status and spending.
Manage keys and limits
Edit limits, enable or disable keys, or delete keys you no longer need.
Create a key: configuration
A name is required. Set the optional limits to suit your use case.
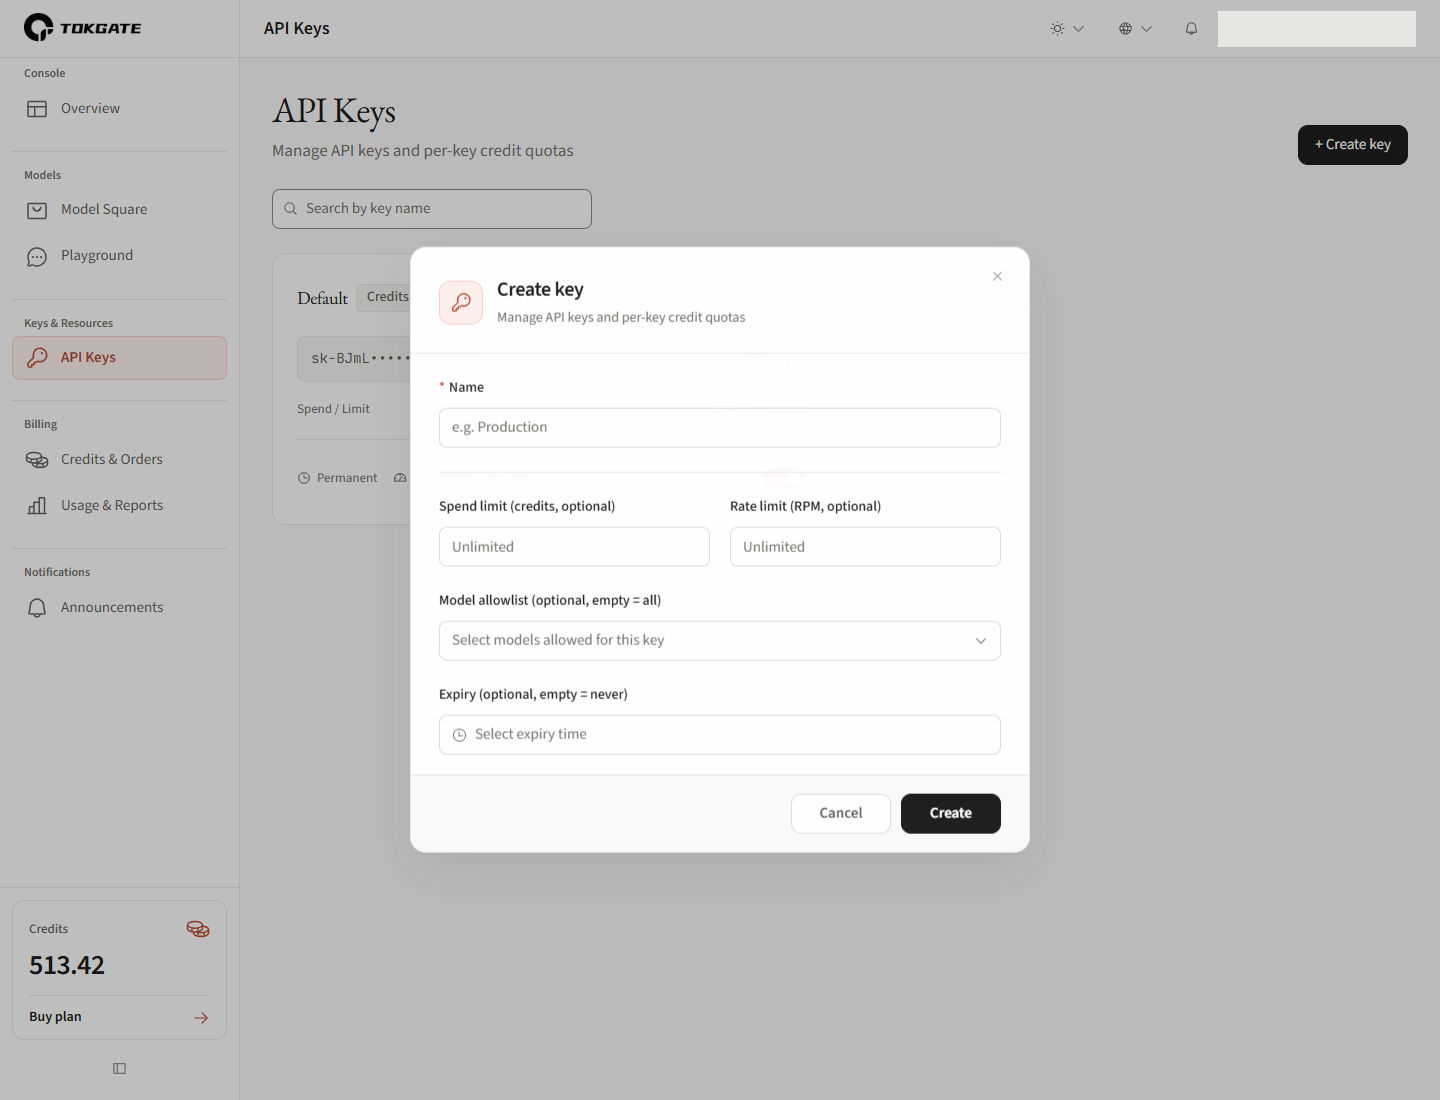
Name
Use a recognizable purpose, such as Production or Testing.
Spending and rate limits
Spend limit caps cumulative usage for this key. Rate limit caps requests per minute. The screenshot uses Credits billing, so the spending limit is in Credits.
Allowed models and expiry
Model allowlist restricts which models the key can use. Expiry sets its expiration date. Leave these blank for no extra model restriction and no expiry, respectively.
Submit and save the key
- Submit the form
Review the settings and select Create.
- Copy and save the full key immediately
Copy the full key from the confirmation dialog to a password manager or secure application configuration. After closing, the list shows only a masked value. If lost, create a replacement and update your application. Never place keys in public pages or repositories.
Continue with API integration
Follow the quickstart for your first request. Use the API reference for parameters, responses and error codes.
Billing
Credits and top-ups
Buy Credits and check changes to your balance. Review individual request charges in Usage.
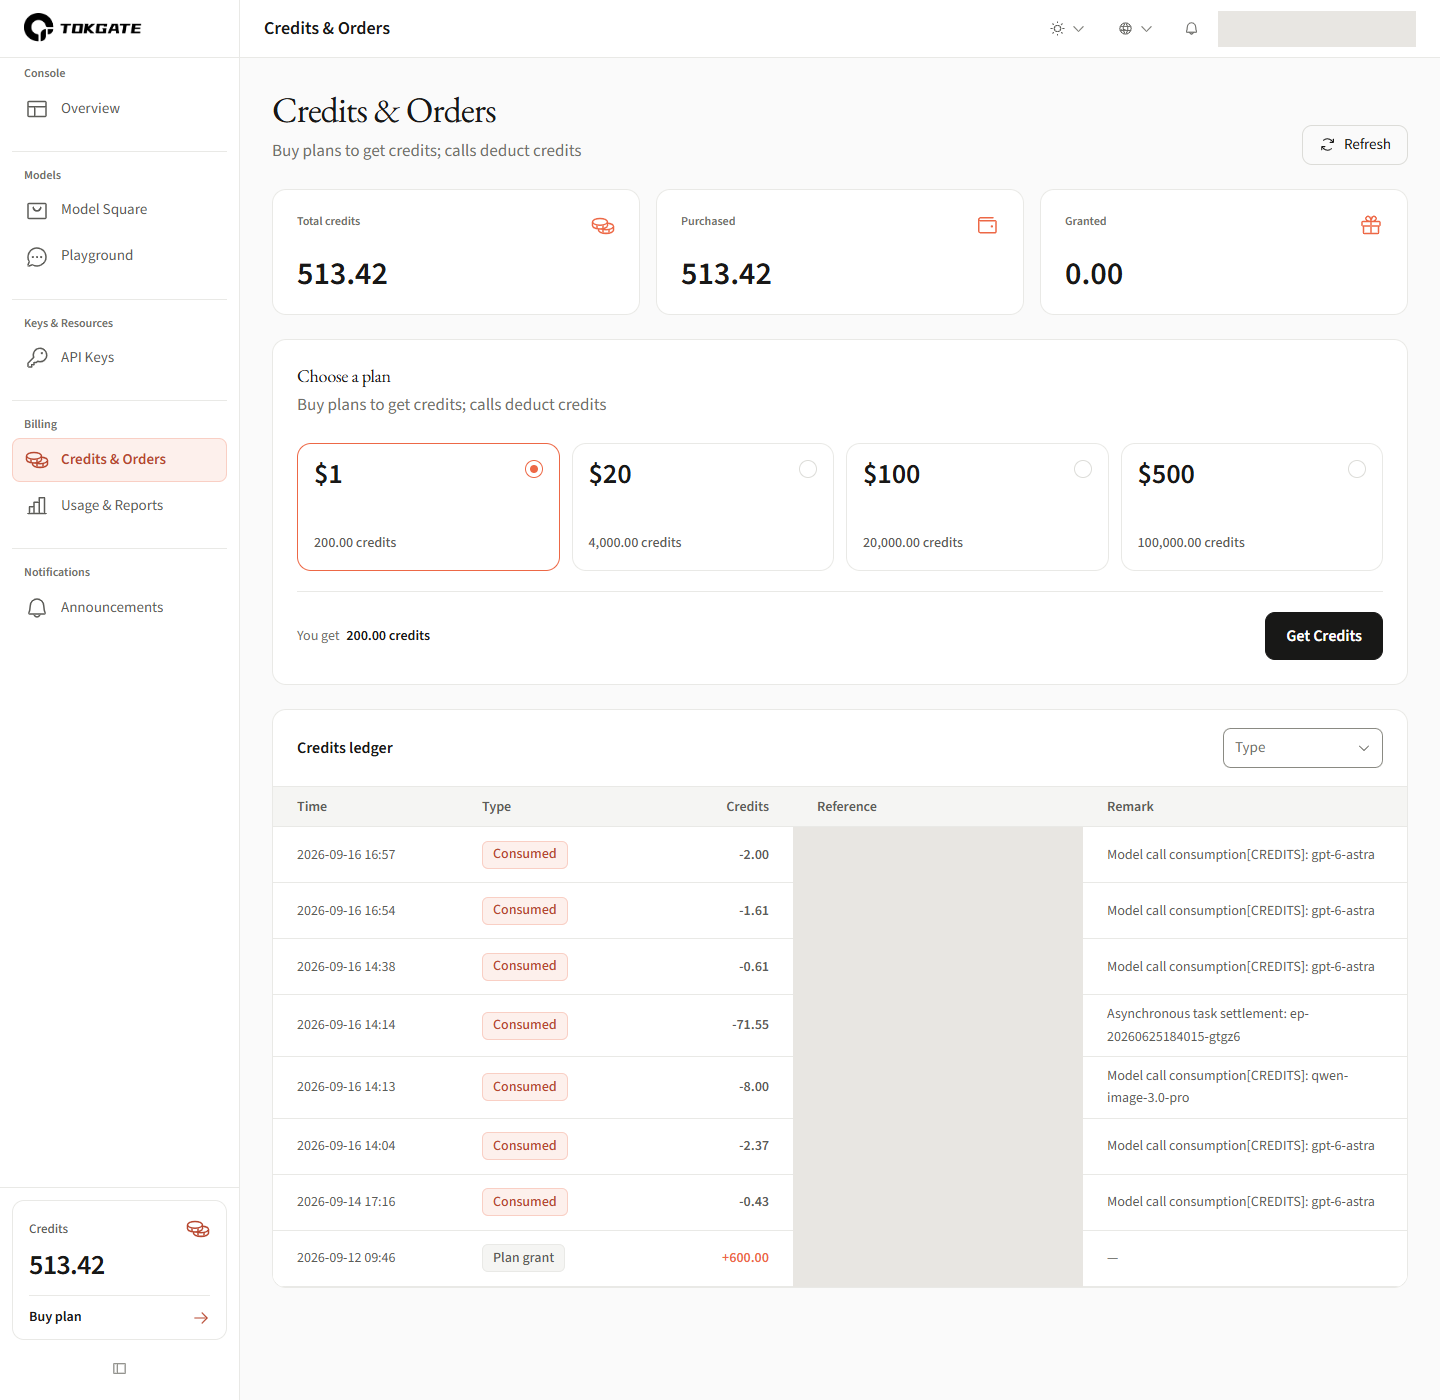
Available credits
Check your Credits and their breakdown. Refresh manually when needed.
Top-up plans
Compare each plan's price, Credits and bonus credits.
Credit ledger
Review credits added and deducted. Cash-balance and order sections depend on the enabled billing mode.
Buy Credits: choose a plan, pay and check the result
- Choose a plan and open checkout
In Credits & Orders, select an amount and check the Credits you will receive. Select Get Credits to open checkout. Opening checkout does not charge you.
Choose a payment method
Review the plan and amount due, then fill in the details for your payment method.
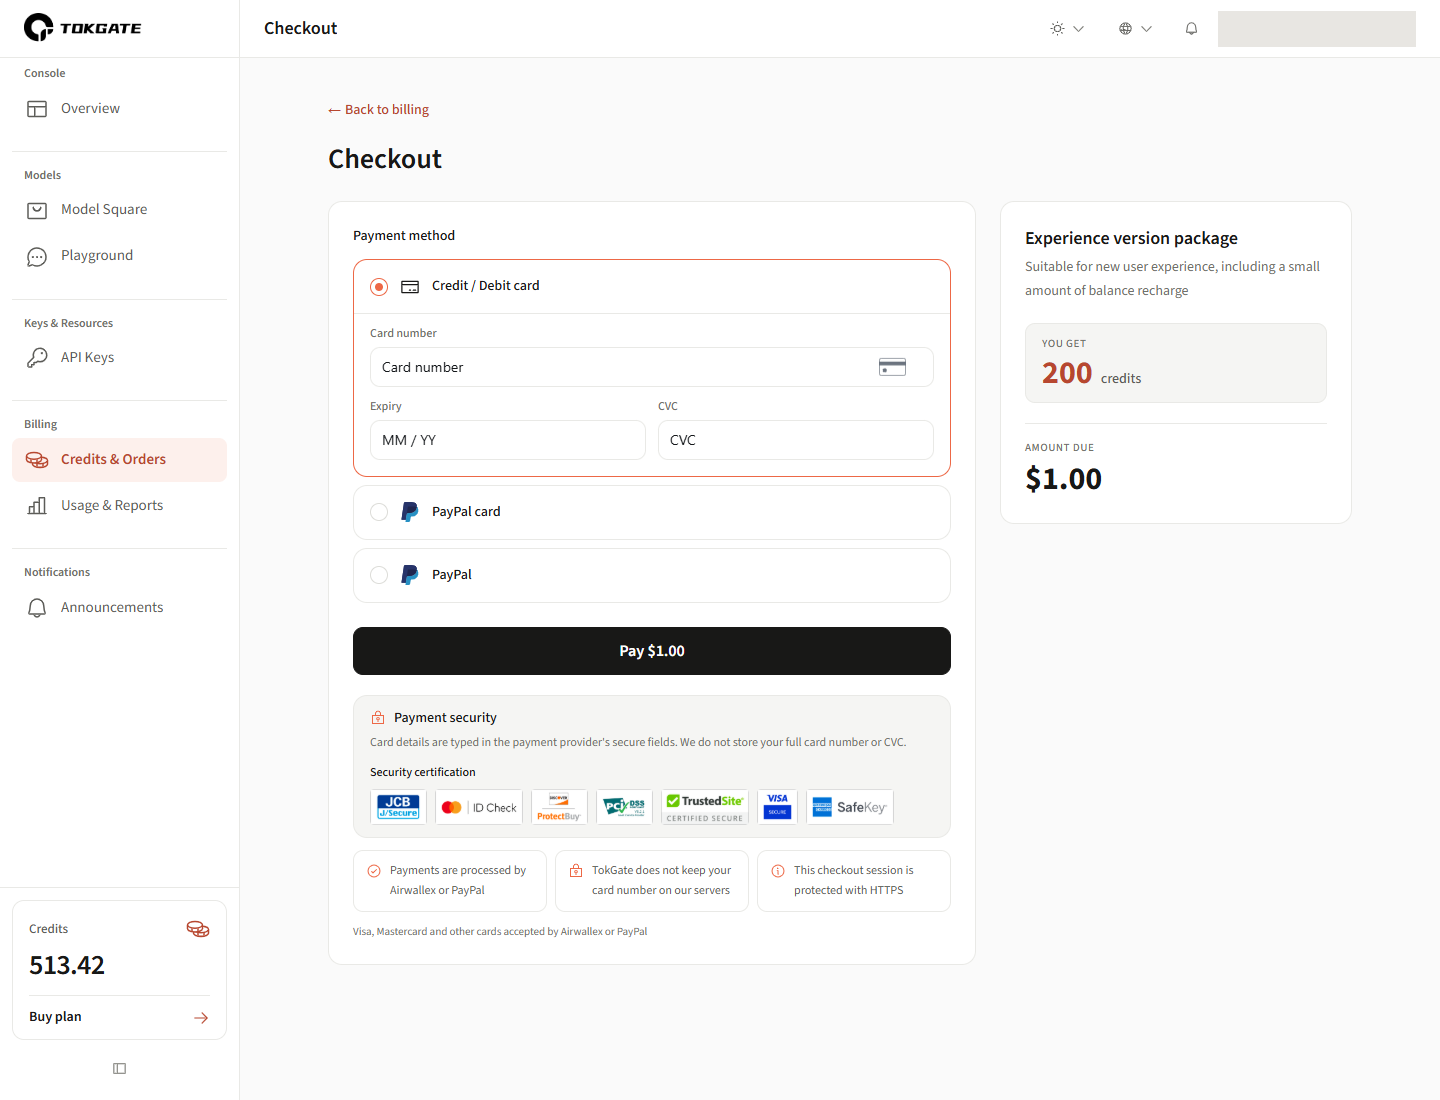
Payment methods
Card payment is selected by default. PayPal card and PayPal account options are also available where shown. Switching methods changes the form; it does not immediately create a payment order. Refer to the current page for available methods.
Fill in the payment form
For card payment, enter the card number, expiry and security code. Follow the PayPal card form for that option. With a PayPal account, submitting redirects you to PayPal for authorization.
Review the amount and pay
Check the plan summary and amount due, then use the payment button below. A processing overlay appears while payment is underway; avoid clicking again. Complete any additional verification requested by the provider.
Check the payment result and Credits
The result page checks the payment and order status and displays success, failure or pending confirmation. Opening checkout or completing a redirect alone does not confirm that credits have arrived.
| Status | Next step |
|---|---|
| Success | Check the order and amount, then return to Billing to review Credits and the ledger. |
| Pending | Wait for the check to finish or use Check again. Do not pay a second time. |
| Failed | Read the error. If a retry option is available, return to checkout to try again. |
If credits have not arrived
Check the payment and order status; use Check again when pending. If the issue persists, keep the order ID and payment receipt and contact support. Avoid duplicate payments. Requests that failed for insufficient credits must be sent again manually after the balance updates. Cash-balance top-ups and related orders appear only if pay-per-use balance is enabled for your account.
Usage
Usage and reports
Review model usage, request status and duration, and export records when needed.
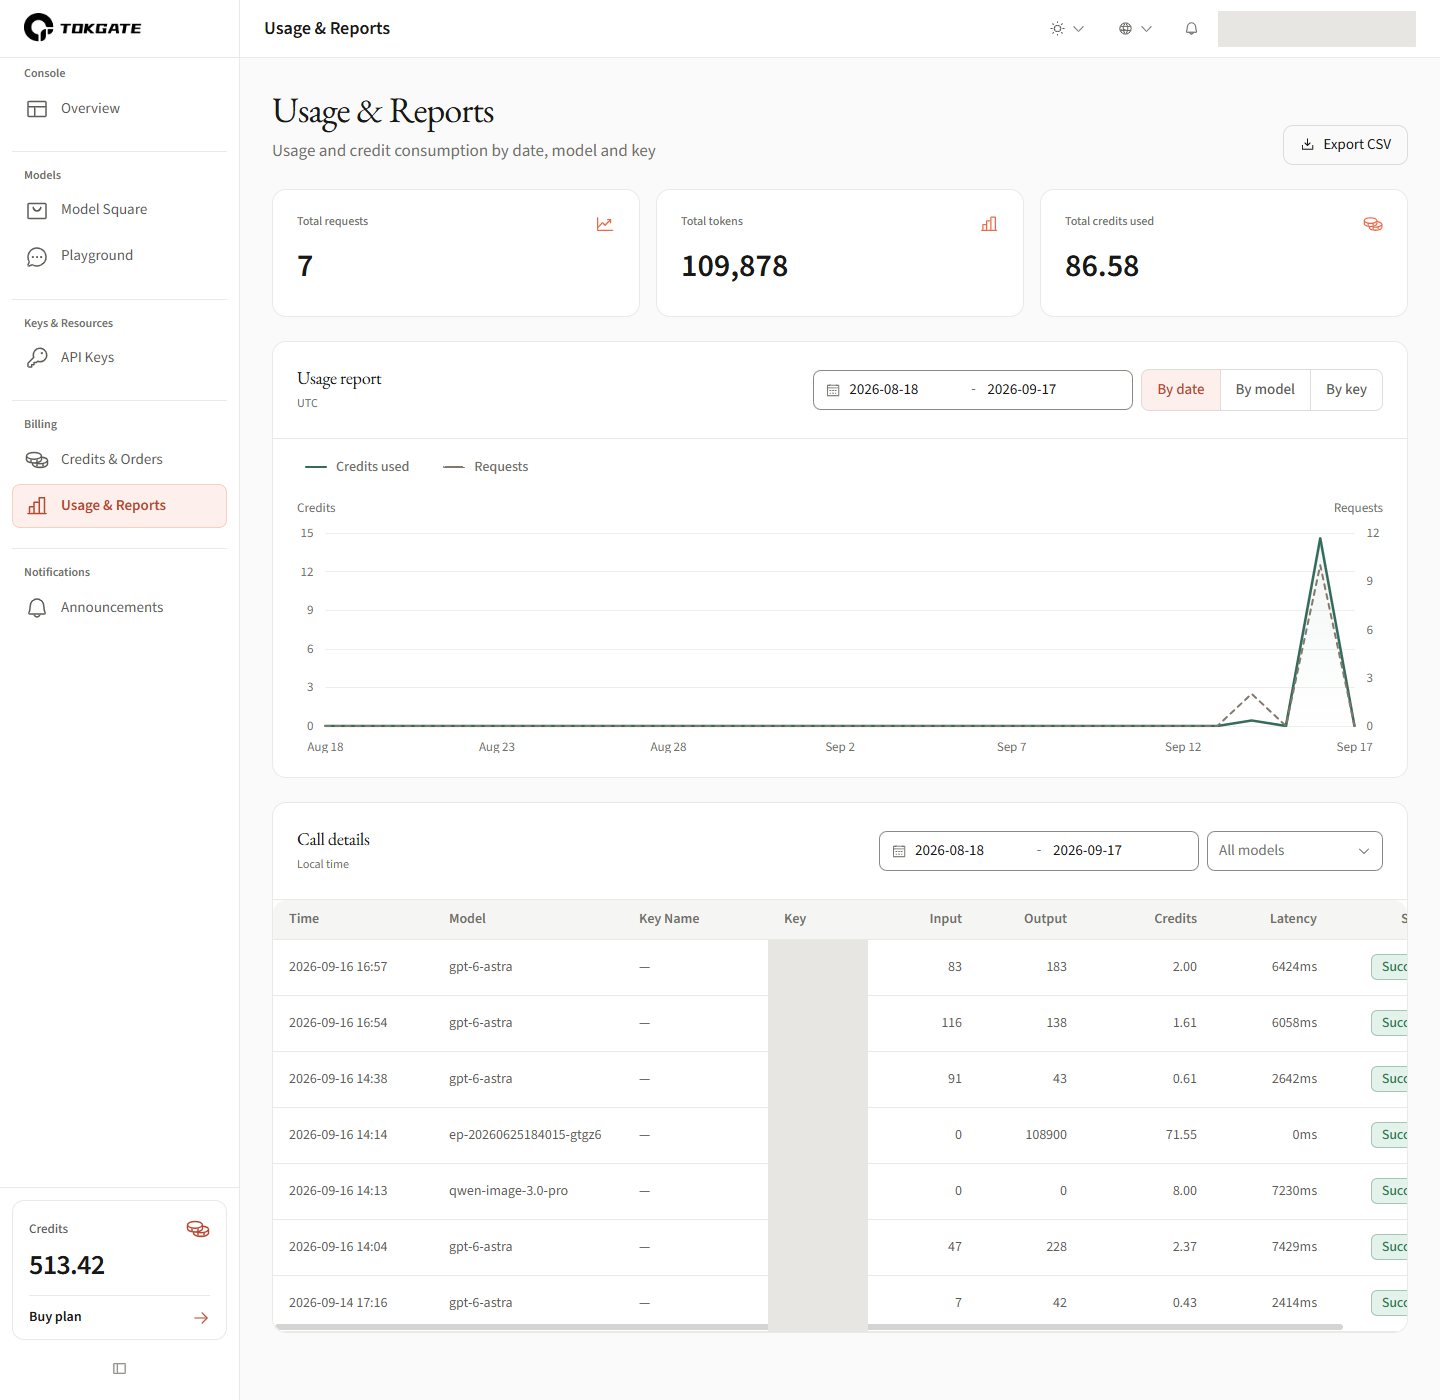
Usage summary
View totals for requests, tokens and Credits consumed.
Reports
Choose a date range and group by date, model or key to review trends and distribution.
Request details and export
Select a date range and optionally a model. Review request time, input, output, cost, duration and status. Export CSV uses the request-detail filters.
Reports and request details each have their own filters. Request logs are available on this page.
Announcements
Platform updates
Read platform notices and updates.
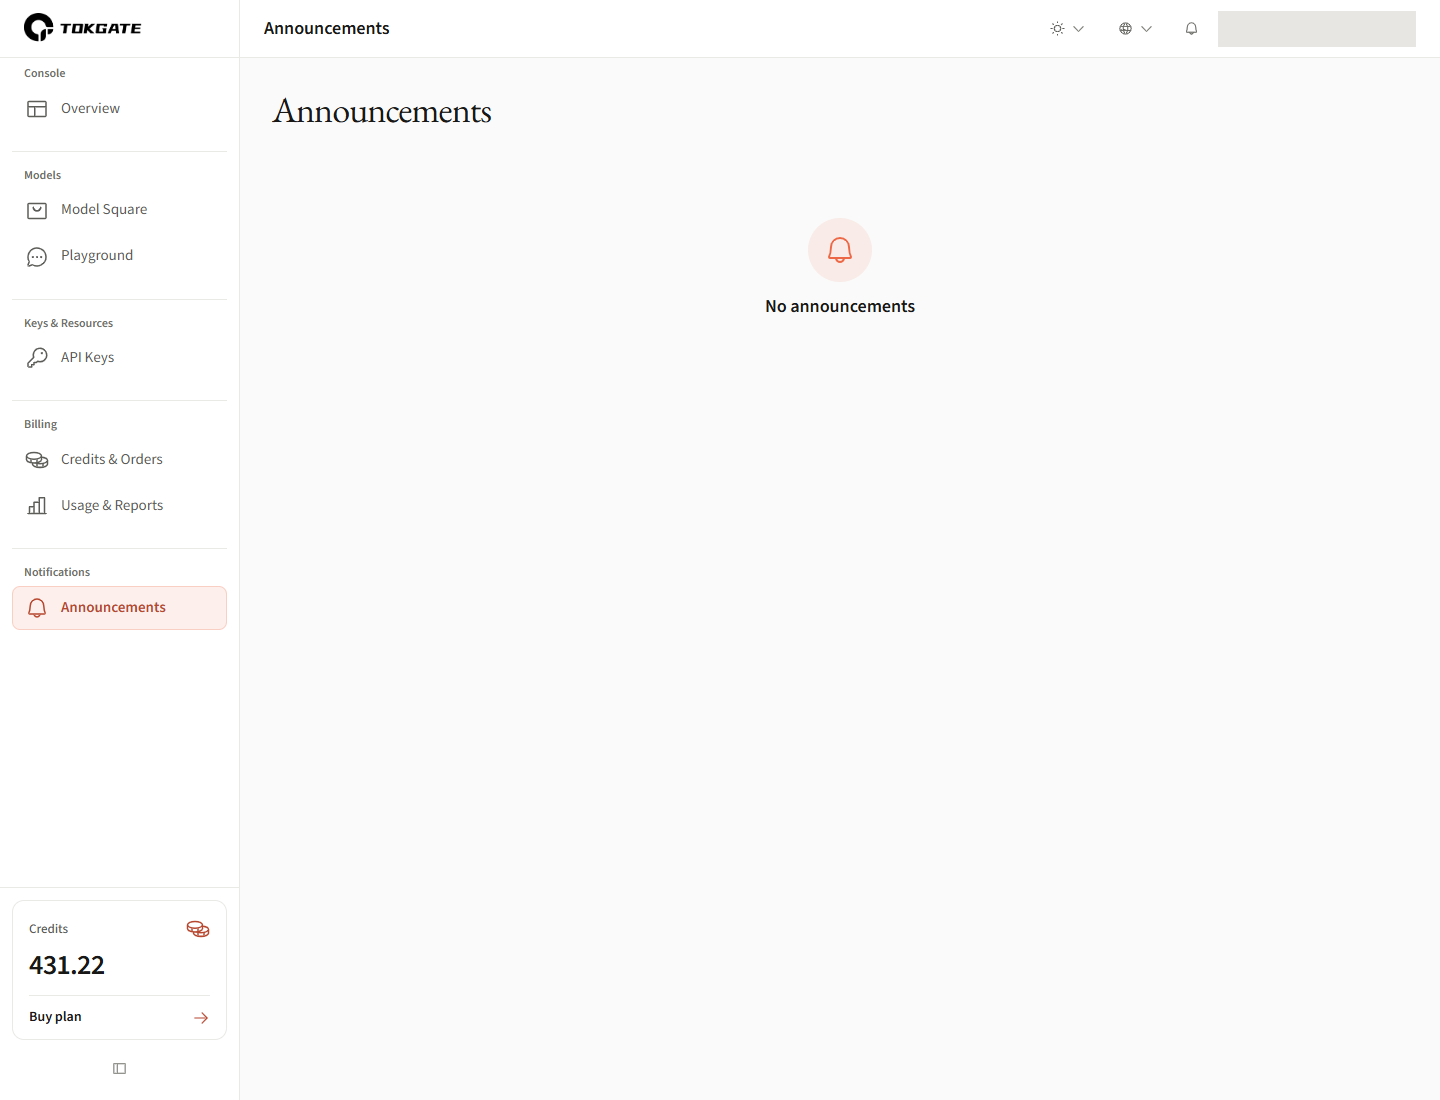
Open announcements
Use Announcements in the sidebar or the bell in the header. The bell shows the unread count.
Announcement content
No announcements means there are currently no notices. When notices are available, read them here for the relevant details.
Settings
Account preferences
Open Settings from the user menu at the top right to view your profile and manage password and appearance preferences.
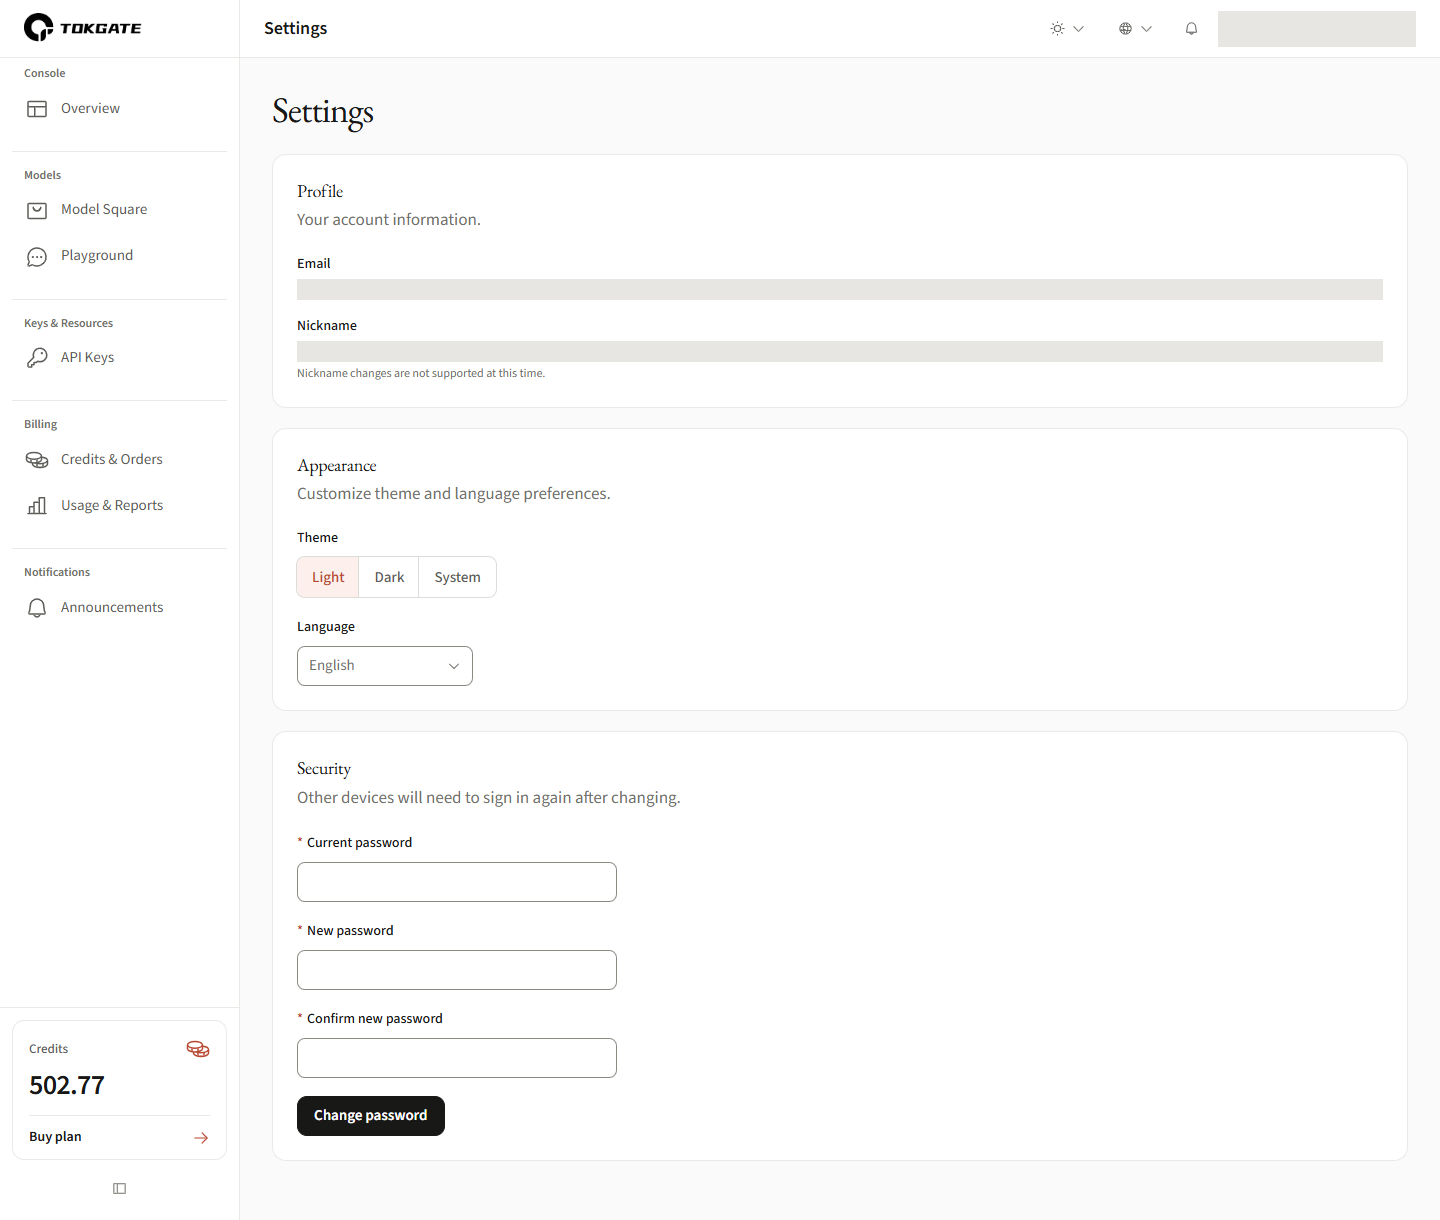
Profile
View your email address and display name. Profile information is currently read-only.
Appearance and language
Choose light, dark or system theme, and change the interface language.
Password
In Security, enter your current password, new password and confirmation to change your password.